

RESOURCES & TIPS
FOR ARTISTS, MAKERS
&
MULTI PASSIONATE CREATIVES
How to Increase Your Sales at Craft Shows (Expert Sales Tips from Experienced Craft Fair Vendors)
Want to learn how to sell more at craft fairs? You've come to the right place to boost your craft show sales! Get expert advice from two seasoned veterans of the maker market scene.
Want to learn how to sell more at craft fairs?
You've come to the right place to boost your craft show sales!
In this video & blog post, get expert advice from two seasoned veterans of the maker market scene: Nicole Stevenson and Mallory Whitfield.
Nicole Stevenson is the co-founder of Patchwork Show, which grew from a 25-vendor parking lot event to a multi-city phenomenon supporting thousands of creative businesses across nearly a dozen cities. She also founded Craftcation, the first business + craft conference of its kind in the U.S., and previously built Random Nicole, a six-figure clothing line featured in over 250 shops worldwide.
Mallory is the creator of Badass Creatives and author of How to Make Money at Craft Shows: Art Market and Craft Fair Tips & Tricks. She spent nearly a decade selling handmade products at craft shows.
Watch the video above, or keep reading below for our tips on how to increase your craft fair sales and make more money from your handmade products!

Tips for Selling More at Craft Shows
Here’s our tips for navigating the application process, getting on the jury's good side, and increasing your chances of success:
Create an Inviting Booth Experience
Your craft fair booth setup is your first opportunity to attract potential customers.
Nicole emphasizes the importance of creating ways to draw people into your booth and keep them engaged:
"One of the things that I love is having a little activity for kids or whoever's with people who the person is shopping... Some of our vendors I've seen them do a little coloring station, so they'll have like a little tiny table and kids chairs and you know just Xerox coloring pages and some crayons and that will keep the child engaged while the parent is shopping and that will increase your sales absolutely."
Another smart strategy Nicole suggests is using your less-than-perfect items strategically:
"I'll bring any of the stuff that I made that didn't work out very well, like my imperfects, I'll have those at the front to kind of draw people in. And it's also a great way to get rid of stuff that didn't work out."
Just because that handmade item might seem less-than-perfect in your eyes (we know how creatives often struggle with perfectionism!) - that doesn’t mean that it won’t sell, especially if priced appropriately!
Strategic Pricing and Promotions
Smart pricing strategies can significantly impact your sales. Nicole shares her experience with strategic pricing, using 2-for-1 deals as an example:
"I love two-fers. So, you know, whatever the thing is… when I was selling my t-shirts, I feel like it was $28 a shirt or two for $49. So it was a huge discount when you bought two and especially instead of saying like $56, I did $49."
Mallory confirms this strategy's effectiveness: "One of the things I sold was earrings and I would do... $12 per pair or two for $20. And I had a little sign about this 2-for-1 deal and those were some of my best sellers."
Whether it’s signage for pricing and promotions, or setting up your booth so that it invites people to shop and explore, the way you design and lay out your craft fair booth can make or break your sales. That’s why we also did a whole video dedicated to craft show display ideas:
Maximize Payment Options
Nicole emphasizes the importance of offering a wide range of payment options:
"Make sure that you accept multiple types of payment. So I know we all pay with cards, but have cash and have change. Have cash, have change, have cash, have change. And then accepting Venmo, PayPal, Apple Pay... all of that stuff is going to increase your sales."
Basically, you want to make it as easy as possible for craft fair customers to make a purchase from you!
Create Strategic Impulse Buy Opportunities
Many of the rules that apply to any type of retail environment also apply to craft show sales. As you’re shopping at your local grocery store or favorite brick & mortar boutique, pay attention to what they do to boost sales and consider how you might apply it to your craft show booth.
For example, Mallory shares her experience with impulse items:
"I carried other artists and makers products in addition to my own. One of the artists that I carried, they had really funny greeting cards and magnets with their work. And so the magnets were like $5, the greeting cards were like $4 at the time... the sales of these low-ticket items would often make my booth fee. And so then I got to really make extra money on all the other higher-priced stuff."
When selling at craft shows or art festivals, it can be helpful to have products at a wide range of price points, both inexpensive impulse buys as well as higher end products.
For a fine artist like a painter, for example, this might look like having magnets, greeting cards and prints of your work as low-ticket items that are at a price point accessible to many people. You would also have original artwork or paintings for sale at a much higher price point (potentially hundreds or thousands of dollars per painting).
Inventory Management Tips
One thing newbie craft show vendors often wonder about is, “how much inventory should I bring to a craft fair?”
Nicole offers a crucial rule of thumb for inventory:
"How much stuff should I have at a craft fair? I will say you should have at least 10 times what you hope to sell. So if you hope to sell a hundred dollars worth of stuff, you should have a thousand dollars worth of stuff with you at the craft show."
She adds: "I found that the more stock and variety I brought to a show... the better I would do. Once my stock got dwindled, so did my sales."
Proper inventory management is a crucial skill for any type of retail business, craft artisans included! To learn more about this topic, check out the interview Mallory did with craft business coach Gwen Bortner:
Pricing Your Products Properly
Nicole provides detailed insight into pricing strategy:
"I am a strong believer in a pricing formula... Looking at what are your materials costing you, do not forget to put everything in there. So if you make t-shirts and you screen print on them... what if you sew a tag on the back? And then you're like, okay, the cost of the tag, but what about the cost of the thread? And you're like, it's only like two cents. Well, guess what? That two cents adds up over time."
She emphasizes the importance of proper pricing: "Underpricing, it just hurts everybody. It hurts all of us. So don't underprice."
Custom Orders and Future Sales
Both craft show experts emphasize the importance of being flexible with custom orders. Nicole shares:
"I did tons of custom orders and I would have people pay half of it upfront at the show and then they paid the other half when they picked it up. Yeah, and that worked really well for me."
Talk to People and PRovide A Great Customer Experience
If you want to sell more at craft shows, you need to interact with customers. The art of selling means you need to talk to people and not just hide in a chair at the back of your booth.
Mallory notes that not everyone is naturally suited to selling:
"For some artists... Sometimes you have a big craft show and you might need a helper. There are some artists who have actually found that it is better to just straight-up hire a helper who is more of that extroverted customer service salesperson type if you are really just too shy."
Nicole agrees, adding: "I never had a time where that was not worth it, where it didn't increase the sales enough to at least pay for that, what I was paying that person."
Post-Show Sales Strategies
Both experts emphasize the importance of email marketing. Nicole advises:
"Collecting email addresses at shows if you're not doing that, you are missing out on a huge, huge opportunity. I'm also a big fan of giving them something for signing up for your email address, like having some type of an opt-in."
Learn more about email marketing for handmade businesses
Final Thoughts
Success at craft shows comes from a combination of thoughtful preparation, strategic pricing, and excellent customer service. As both Nicole and Mallory demonstrate through their extensive experience, even small changes in your approach can lead to significant increases in sales.
Remember that every show is a learning opportunity. Take notes on what works well and what doesn't, and continuously refine your approach based on your experiences. With time and practice, you'll develop a system that works best for your unique products and customer base.
Want to learn more about how to be successful at craft shows?
For more marketing & business tips for artists and handmade business owners, subscribe to Badass Creatives on YouTube, or check out other craft fair tips:
How to Get Accepted to Juried Craft Shows (Tips from Craft Show Organizer Nicole Stevenson)
Applying to juried craft shows or art events can be a daunting process, especially when you’re met with rejection despite your best efforts. But don't worry! Getting accepted to a juried craft fair is totally possible with the right approach.
Applying to juried craft shows or art events can be a daunting process, especially when you’re met with rejection despite your best efforts. But don't worry! Getting accepted to a juried craft fair is totally possible with the right approach.
I spent nearly a decade selling handmade products at craft shows, including many juried events. (I even wrote a book about it!)
And in this video, I invited Dear Handmade Life founder Nicole Stevenson to share her insights on how to get into juried craft shows.
Nicole has been running Patchwork Show, a series of juried craft shows in California, for more than 16 years. She's spent a lot of years jurying craft fair vendors and has some tips on what crafters should expect and how to stay on a craft show organizers good side!
Watch the video, or keep reading for our tips on getting accepted by juried craft shows and art events!
But first, What's the difference between a juried craft fair and a non-juried craft show?
A juried craft show or art event involves a selection process where you have to apply and be accepted to participate in the show. Sometimes it's just the craft show organizer who is there to review the applications and make sure that the vendors that are accepted are a good fit for the show, based on whatever that particular show is looking for. Sometimes a panel of experts reviews and approves applicants based on the quality and originality of their work.
A non-juried show is where you apply within their deadline, and you get in. That's basically it. There's no formal review process, so the range of vendors at the show can vary in terms of the quality of their work. Non-juried craft shows usually don't have strict rules about craftsmanship, and they may allow non-handmade items or MLM products such as Stella & Dot or Avon.
For handmade vendors and artists, juried craft shows might offer greater prestige and potentially higher sales, while non-juried events provide broader access and more opportunities for exposure.

Tips for Getting Accepted by Juried Craft Shows & Art Events
Here’s our tips for navigating the application process, getting on the jury's good side, and increasing your chances of success:
1. Understand the Craft Show’s Juried Process
Each craft show has its own unique set of criteria and judging process.
While Nicole shares tips based on her own experience running a juried craft show, each event will have their own application process and requirements.
Familiarize yourself with these specifics by thoroughly reading the event’s guidelines and rules. Pay attention to:
Eligibility Requirements: Ensure your work aligns with the show's focus and requirements.
Judging Criteria: Understand what the jury is looking for, whether it's originality, craftsmanship, or marketability.
Application Deadlines: Mark these on your calendar and plan your application timeline accordingly.
Nicole advises craft fair applicants to consider whether your brand and your handmade products are a good fit for the show.
Who do your handmade products appeal to? And are those people attending the juried craft show you're applying to?
Nicole suggests walking the show before applying or researching past shows to see if your ideal customer will be there.
2. Craft a Strong Portfolio
A compelling portfolio is crucial for making a lasting impression.
As Nicole points out, "You need some type of a way for the jury to see what you make. At Patchwork Show, we ask for your website, your Instagram, your Etsy, any or all of those things. We also have a section on the application that says, if you don't have an online portfolio, upload five photos of your work. Because for our show in particular, I like being a show for emerging makers."
As she points out, while some shows might not care if you have a website or Etsy store yet, you still need to be able to provide high quality photos of your work.
Nicole says, "It needs to be as professional as possible. Your photographs need to be well lit. They need to be in focus... Photographs are kind of our biggest thing that we look at as the jury."
Your portfolio should include:
High-Quality Photos: Use professional photos with good lighting and a simple background to showcase your work. Include multiple angles and detail shots to give a comprehensive view. Make sure it’s obvious to the jury what objects in the photos are the products you sell.
Consistent Branding: Ensure your portfolio reflects your unique style and branding. Consistency in your presentation helps the jury understand your aesthetic.
Diverse Selection: Include a range of work to demonstrate versatility, but ensure all pieces align with the show’s theme or focus.
3. Perfect Your Application
Your application is your first chance to make an impression, so make it count:
Follow Instructions: Adhere strictly to application instructions. This includes format, word count, and submission requirements.
Write a Compelling Artist Statement: Clearly articulate your artistic vision, process, and what makes your work unique. Avoid jargon and keep it engaging.
Provide Accurate Information: Double-check all details, including prices, dimensions, and materials. Inaccuracies can detract from your credibility.
If in doubt, or if you're nervous about getting rejected by the jury, ask a few friends or family members to review your application info before submitting. Get feedback on how you can improve before pitching yourself to the craft fair jury.
4. Build a Strong Online Presence
An impressive online presence can boost your application. But simple marketing mistakes could ruin your chances of getting accepted by the craft fair jury!
Nicole told me, "When people put their Instagram as the place to see what they make and then their Instagram account is set to private, that's one of my pet peeves. Or they put their website and it's like, this website's under construction or their Etsy shop is empty, there's nothing in it."
Don't frustrate the craft show organizers before you've even met!
As Nicole says, "Make it easy for the jury to see what they need to see to make their decision because the harder you make it for them, the crankier they're going to get."
As you begin to apply to more competitive juried art events, make sure you have the following:
Professional Website: Ensure your website is updated with your latest work and contact information. A well-organized site reflects professionalism.
Social Media: Actively engage on relevant social media platforms. Share updates, behind-the-scenes content, and interact with your audience.
You do NOT have to be on every single social media platform. It's important to develop a marketing strategy that makes sense for your creative business.
The main thing is to make sure that whatever website or social media info you share with art show organizers is cohesive and represents your brand well.
If you need help developing a marketing strategy that works for your unique business, please reach out.
5. Gather Feedback and Refine
If you don't get accepted into a juried show, it can be hard not to take it personally.
But like Nicole points out, "It's a judgment on not whether what you make is good or bad, but on whether what you make is a good fit for that particular show.
She told me, "I was rejected from a couple of craft fairs in my craft fair career and it hurt. But when I stopped and thought about it, I was like, man, they're right. This wasn't a good fit, you know? And it's not necessarily that your art is bad. (Although it might be, I don't know.) But it's usually that whatever it is that you're making doesn't fit in with what that particular show is looking for. That's all it is."
If you’re consistently being rejected, consider seeking feedback:
Reach Out to the Jurors: Some shows may provide feedback on your application. Use this insight to make improvements.
Network with Peers: Connect with other artists who have been accepted to similar shows. They might offer valuable advice or insights based on their experiences.
Nicole recommends, "You should try to look at your application objectively and think about some general reasons why you weren't accepted. Some shows will allow you to email them and get feedback. We do, but it's after the show season is over. We say if you need specific feedback, email us after the show season is over and we will let you know why you weren't accepted."
She explains, "It could be that your stuff is too expensive. That's something that happens with us. We want our vendors to be successful at our shows. And if they have, you know, $500 necklaces, that's not a good fit for our show. It could be that your stuff doesn't seem handmade, even though you said it was, and it's a handmade only show. It could be that you're in a category that's very competitive, like jewelry is very competitive, and now bath and body is very competitive."
Prepare for the Show!
Once accepted, ensure you’re fully prepared:
Create a Cohesive Booth Display: Your booth should be visually appealing and reflect your brand. Invest time in planning a layout that attracts visitors and showcases your work effectively. Learn more about how to make your craft show booth look great!
Get Your Craft Show Must Haves Ready: Prepare business cards, price lists, and other promotional materials to distribute at the event. My craft show tool kit evolved a lot over the years, with a few handy items I couldn’t live without bringing to a craft fair. Check out my craft show must haves!
Getting accepted into juried art and craft shows requires a blend of preparation, persistence, and presentation. By understanding the show’s requirements, crafting a strong application, and continuously refining your work and approach, you’ll significantly improve your chances of success.
Remember, every rejection is an opportunity to learn and grow. Keep honing your craft, and your dedication will eventually pay off!
For more marketing & business tips for artists and handmade business owners, check out Badass Creatives on YouTube!
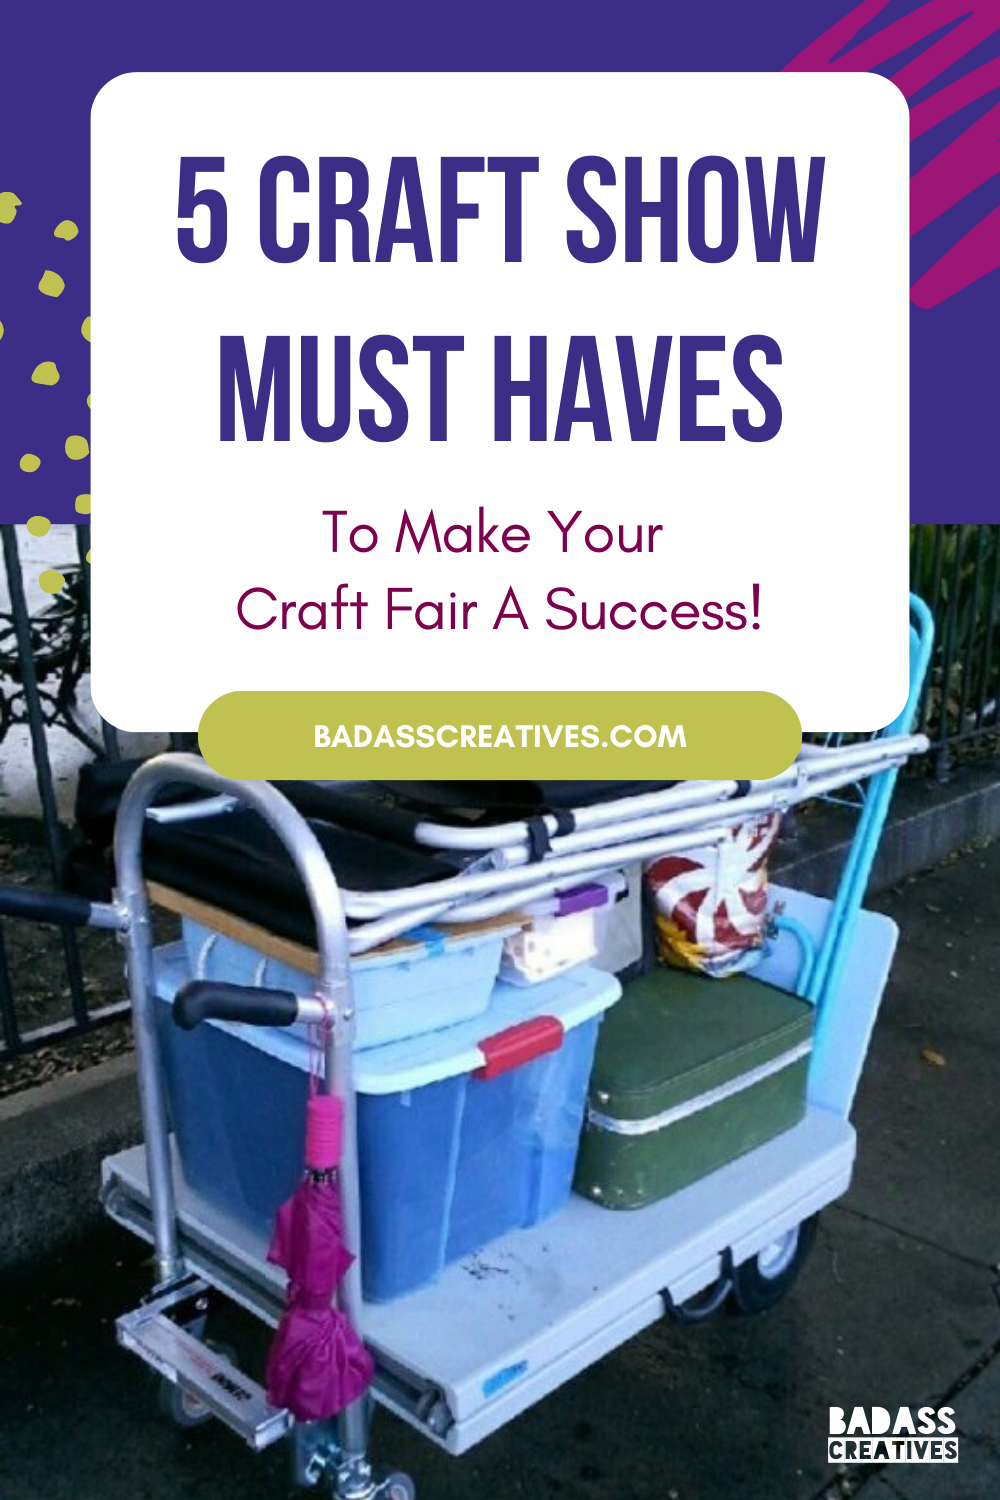
5+ Craft Show Must Haves (and then some!)
Don't waste time like I did. Based on my 10 years of craft fair experience, these are my top 5 craft show MUST HAVES. (Plus lots of free tips & tricks!)
I did my fair share of craft fairs for more than a decade, and I learned a lot of tricks along the way. (I even wrote a book about it.)
My craft show tool kit evolved a lot over the years, with a few handy items I couldn’t live without bringing to a craft fair.
Whether you’re preparing for your first craft show and wondering what to bring, or you’re an experienced craft show vet looking to improve your arsenal, I hope you’ll find my top 5 craft show must haves useful.
Watch this video to hear me talk about my craft show must haves, or keep reading:
Disclosure: This post features Amazon Associate affiliate links, which means if you purchase a product via one of these links, I earn a small commission from qualifying purchases. This helps to support this site and does not affect the price you pay.
1. A great tent!
If you’re planning to do outdoor art markets or festivals, a good craft show tent is an absolute MUST! Many event organizers require everyone to have white 10×10 craft show tents, to keep things looking classy & uniform.
My EZ up tent lasted me through many years of craft shows, and it was worth every penny!
I had the pop-up canopy kind of EZ up tent with four zippered side walls, which are great for closing up shop overnight or keeping out the elements on a rainy day.
2. A professional looking tablecloth!
After years of fussing with big pieces of fabric and homemade tablecloths, pinning and tucking just so to keep it looking nice, I made the move to these fitted polyester tablecloths. They’re so much easier, and they look super professional. They come in a variety of sizes to fit different lengths of folding tables.
You could always screen-print or add appliqués to the front to customize it with your business name or logo!
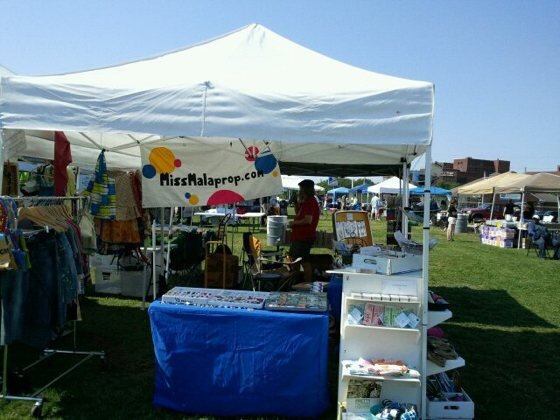
You can see my own tablecloths pictured below, from my craft show booth at Gretna Heritage Festival:
For my 6 foot tables, I used a pretty standard size plastic folding table I found at a hardware store. These tables are durable, but they can sometimes be heavy and bulky.
I also found that products made for camping worked great for craft shows, as they folded up easily and often didn’t weigh as much. For instance, I also had a lightweight aluminum folding camping table that I used for craft fairs.
3. A comfy & tall chair!
I spent years sitting on low chairs, uncomfortable stools or just standing during craft shows, to stay eye-level with my customers so I could talk to them. My tall fold-up director’s chair became a lifesaver!

The best directors chair for craft shows is one that can put you at the same level as your customers, yet be light-weight, portable and comfortable. It helps you to make a personal connection and sell more than if you’re sitting down low, almost hidden behind a table in a traditional outdoor folding chair.
After years of doing these events, and often times standing all day or sitting perched on an unsupportive folding stool, I started seeing other artists in their booths, sitting on tall directors chairs that were portable and made for outdoor use. After searching high and low around local sporting goods stores with no luck, my search eventually led me to Amazon, where I found this chair and immediately ordered it.
Once I got mine, other artists asked me all the time where I got it. I love this chair and it has lasted me years of pretty serious use and abuse. The heavy-duty aluminum chair frame is NOT physically heavy at all, but it IS super durable. I love that it has side pockets, which are great for storing things in while I’m working behind my booth. (Sometimes I’d use a plastic grocery bag in one of the pockets as a liner for a make-shift trash can on the go.) This chair is definitely on my list of craft show must-haves.
Even if you don’t sell at craft shows, this chair is great for outdoor use at home, not to mention for other outdoor activities like sporting events, or selling at flea markets or garage sales! This is also a great portable director’s chair for makeup artists who may need to bring a chair to locations for their clients to sit on during makeup applications.
4. Shopping bags or gift wrap!
You’ll definitely want to have some sort of shopping bags or gift wrap available!
If you can make sure that your packaging matches your brand, even better!
In this video, I discussed some branding basics with my friend & small business branding expert Holly Marsh of Ecommerce Arcade:
Holly suggests, "Use color as part of your brand identity and try to stick with that. It's okay if not everything matches exactly. For example, if you're trying to buy solid colored tissue paper for your online orders, it's not going to be that exact Pantone color, and that is okay! But if you're using basically the same colors throughout, people will start to associate those colors with your brand."
It's important to create a consistent color palette and visual aesthetic in your craft show booth.
Your color palette should guide your packaging, like shopping bags and tissue paper, as well as how you design your booth display at a craft show.
What size you need depends on what you sell, of course. I usually keep a few sizes on hand – small organza bags for jewelry and some bigger paper shopping bags for larger items.
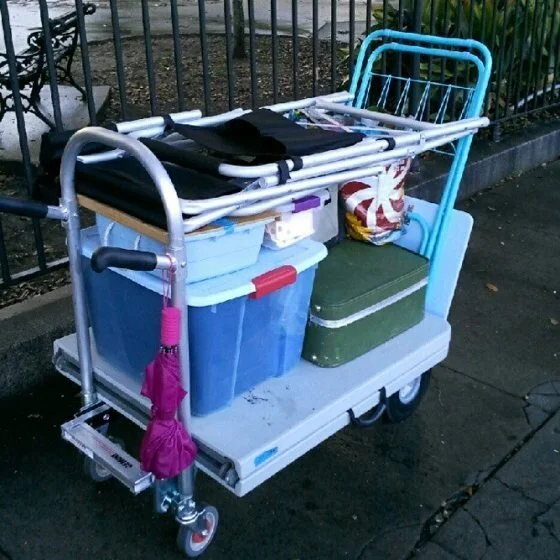
5. A convenient hand truck or dolly!
Finally, if you’ll be hauling all your stuff to and from your car or truck to your craft show booth, you’re going to want wheels! I cannot begin to tell you how much using a Magliner convertible hand truck changed my craft show life!
I don’t know how I could have done Frenchmen Art Market so many nights without it – I was able to get everything I needed on it in one trip and haul it a couple of blocks back to my car with ease:
It’s pretty high end, but considering all of the physical labor involved in doing craft shows, the Magliner was worth it for me. Your body will thank you!
If you’re a craft show newbie just getting started, I also used a smaller (and cheaper) Magna Cart for shows where it’s easier to do multiple trips back and forth to my car.
You’ll notice from the picture above that I also used a lot of stackable storage bins with latching handles to transport my products to and from the craft fairs. These made it easier to stack everything on my Magliner, and they also protected my inventory, particularly during outdoor craft shows where I might encounter rain or mud.
Bonus craft show ideas:
Okay, so maybe I fibbed. I mayyyy have more than just 5 craft show must haves. Here are a few more of my favorite art show display ideas:
A curtain backdrop for sun protection and visual appeal!
Doing outdoor art markets can take a lot out of you, especially if the sun is hitting your neck all day long. That’s one reason I came up with the curtain backdrop for my art show tent seen below:
I made it by sewing together three semi-sheer curtain panels. On each outside edge, I added a few pieces of ribbon to make it easy to tie off the edges to the sides of my tent poles. At the top of the curtain, I used spring clamps to attach it to the top of my tent. Easy-peasy!
Not only was it great for blocking the sun, but it also provided a colorful and eye-catching background for my booth! (Hint: sew in something at the bottom of the panels to give them a little extra weight so they stay more secure when it gets windy!)
Gridwall for displaying your art!
Many artists use gridwall panels to display their artwork. This type of portable craft show display setup works well for fine artists who have paintings or photographs to show off, but most gridwall systems have other accessories available like clip-on baskets or shelves or hanging racks, which can also show off clothing or accessories too.
Above you can see a photo from one of my own craft show booths. I’m not the artist using the gridwall seen here (that’s the back of the booth next to me), but you can see here how the back of the artwork is attached to the gridwall with clips or zip-ties.
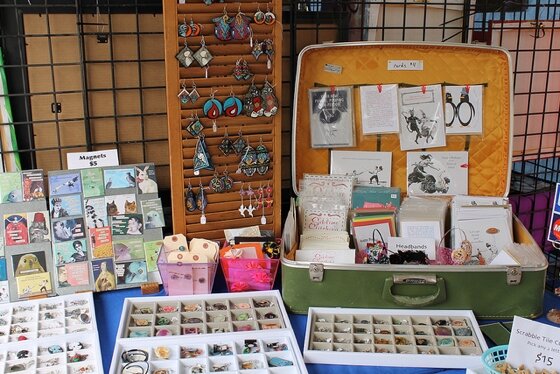
You can also see some of my own display systems here, including a vintage suitcase. I sewed a few ribbons onto the suitcase lining so that I could clip greeting cards to the inside of the suitcase. I also found an old shutter that I turned into a display for earrings.
Stackable jewelry trays became another lifesaver for me. After many craft shows where I'd spend a bunch of time laying out necklaces and jewelry on my table, and then carefully packing each item up again at the end of the show, I discovered the magic of stackable jewelry trays! These made the booth setup and breakdown process so much faster!
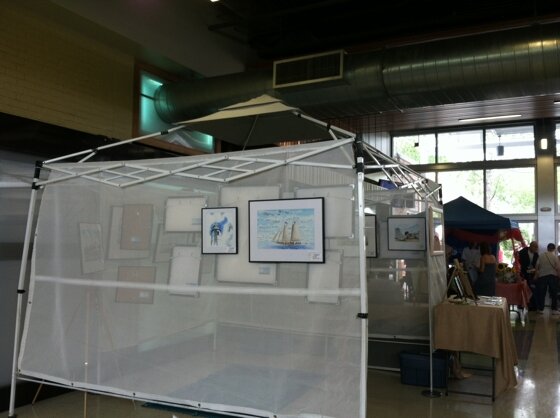
I took the above photo at one indoor art show I did. Even though we were inside, the artist used his tent frame to hang these screens from so that he could then attach his artwork.
There are definitely plenty of expensive, professional art display panels out there, but I found this DIY video tutorial that explains how you can make similar art display panels for around $50 per panel using materials found at the hardware store.
Craft show checklist:
While this is by no means a totally comprehensive list of what to take to a craft fair, this should cover most of the important things that you should plan to have on hand, but might otherwise forget to bring with you.
plenty of cash for making change
a way to process credit cards, like Square
safety pins
antibacterial wet wipes and/or hand sanitizer
tape
scissors
calculator
business cards
sunscreen
bug spray aspirin / ibuprofen
a small cooler to hold water or drinks, plus reusable freezer ice packs to keep it cold during summer
a Thermos filled with hot tea or coffee, and hooded blanket for outdoor craft shows during winter
Craft Show Display Ideas
Want to learn how to make your craft fair booth look great so you can sell more art?
Check out this blog post and this video for ideas on how to display your art and crafts in your booth! I discuss craft show display ideas with my friend & craft show organizer Nicole Stevenson.
Nicole is the founder of Dear Handmade Life’s Patchwork Show - a series of craft shows throughout California, showcasing local handmade and independent businesses alongside food, crafting, activities and more.
Craft Show Tips for Beginners
Are you just getting started with craft fairs? Lucky for you, I wrote a whole book full of my craft show tips, tricks and advice, full of everything I learned from more than 10 years of doing art markets and craft shows regularly:

If you found this post useful, you should also check out my book, How to Make Money at Craft Shows – Art Market and Craft Fair Tips & Tricks. In it, I cover the basics of getting started selling at craft fairs, as well as how to design a great looking booth, how to give outstanding customer service & sell more, and even how to find and create additional events at which to sell your handmade work.
It also includes how to define your target market, where to find good shows to sell at, how much you should expect to spend on a booth fee at a show, promoting your show & getting your customers there, dealing with crazy weather & unexpected events, theft prevention, how to give great customer service, how to use craft shows to create after-the-show sales and lots more!
You can also check out my full Craft Show Tips playlist on YouTube for more advice!
Badass Creatives podcast
Listen to Episode 005 of the Badass Creatives podcast to hear me talk about my craft show tool-kit:
What did I miss?
If you’ve been doing craft shows for awhile and think that I missed something here, please contact me and let me know!
Psst! Like this post?
Bookmark it on Pinterest!

This post was originally published at MissMalaprop.com
5 Tips for a Successful Handmade Craft Shopping Party
Want to sell your art or handmade goods? Try a handmade craft shopping party, inspired by those Tupperware parties. Read these tips to learn how!

Back when I was selling at craft shows regularly, I also hosted some handmade home shopping parties for friends & family to attend.
These handmade craft shopping parties were modeled after Tupperware or Mary Kay parties. I hosted the first party at my house in October 2009, and a few weeks later my friend Leslie hosted a party at a coffee shop here in New Orleans.
Recently a reader on my blog asked if I had any tips on getting started doing these shopping parties. After hosting a few of these, plus plenty of years of selling at craft fairs under my belt, here are 5 tips to help make your sales event a success:
#1 – GIVE YOUR HOST GREAT INCENTIVES!
After scouting some tips I found online, I decided to offer $25 in shop credit plus 10% of the total sales as shop credit to the hosts of my parties.
If you make mainly one type of item, like jewelry or handbags, you might want to offer the host their choice of a certain type of earring or clutch, but since I carried such a wide variety of products, I thought that shop credit would be the easiest way to go.
Think of these incentives as you would a booth fee at your local craft fair. The great part is that, unlike a craft fair, where you pay your fee and then have to make your money back, here you offer the hostess a percentage of your sales as shop credit. If she brings in lots of friends who buy lots of stuff, she gets to reap the benefits, but if the party ends up being a bust, you’re not out a ton of money. (But from my own experience, and the stories I’ve heard from more experienced handmade home shopping party aficionados, you’re more likely to do very well than not!)

Products on display at my first shopping party I hosted at my home.
#2 – MAKE IT FUN!
It’s a party, so treat it like one! Whether you’re hosting the party at your own home, a friend is hosting at theirs or you do it at a coffee shop like we did for my second one of these, make sure there are plenty of drinks and snacks available!
The owners and staff of the coffee shop loved us because we brought new customers into their shop, and at my first home party that I hosted I made sure there was plenty of wine and cheese to go around. Drinks and snacks can be as cheap or as expensive as you’d like… Each party could have a slightly different theme, depending on the host’s preferences.
Taking a cue from Tupperware parties that I had been to, I also made sure to create some fun and excitement with giveaways! You can pick out a few lower priced items to give away or do a drawing for $10 in shop credit. You can also create fun games or even do a demonstration of how you make your craft. People will see the work and talent it takes to create your items and they just might be more inclined to buy!
#3 – COMMUNICATE YOUR NEEDS FOR SET-UP!
The first party I did was at my house, so I had all day to get my set-up just right and use whatever random materials I had around the house for displaying my goods.
I invited other artist friends to set up in my home as well, and while we were worried at first how to make everything fit, by using furniture already in my home, we made it work. We accidentally scratched our credenza though, so whether at your home or someone else’s, if you’re going to use someone’s furniture to display your goods, make sure to throw a tablecloth over it first! That’s one of those little things that didn’t even occur to me but in hindsight I wish I had thought of it before we scratched up the furniture!
For my second event at the coffee shop, my friend Tressa from Flambeaux Design Company and I both set up for the party. Leslie, who had arranged things with the coffee shop manager, had given us details about the space and timing of set-up.
Tressa and I were both a little worried, because we thought we were only being allowed 30 minutes to set up. (I typically needed about an hour or so to feel comfortable.) Luckily it all worked out though… I arrived early to scope out the space and have some ice cream.
The manager introduced himself to me and not only let us set up earlier than we thought, but he also helped us move tables and even ran home to get us extra lighting!
I’d suggest clarifying to the host how much time you need to set up your goods before guests arrive, so there’s no need to stress!

My products on display at a pop-up shopping event I did at my friend’s guitar shop.
#4 – GET THEIR CONTACT INFO!
As I mentioned above, we did some fun giveaways, and the way I had people enter the drawing was to fill out a slip of paper with their contact info, including their name, email address and phone number.
I had lines asking if they would like to be included on my email newsletter list and if they were interested in possibly hosting a handmade home shopping party of their own. I’d ask, if the answer is yes, what day and time do they have in mind? I also left a blank for any additional comments or suggestions.
This is your captive audience… they’re already interested in what you do, so don’t miss the opportunity to stay in touch with them!
#5 – ACCEPT AS MANY FORMS OF PAYMENT AS POSSIBLE!
For a long time, I did craft fairs and I didn’t have any way to accept credit cards. I definitely wanted to, but I didn’t feel that I was doing craft fairs often enough to justify it.
These days, it’s easier than ever to accept payment by all major credit cards. Many crafters use Square or Venmo, but research which options are best for your business.
This is a definite necessity! The majority of my sales are by credit or debit card now, and some customers still like to pay by check, which I gladly accept!
Think like your customer – if you’re like me, you probably don’t carry much cash on you, so it’s often more convenient to pay by debit or credit card. Don’t miss an opportunity for sales!
I hope this helps some folks!
I had a lot of fun doing these handmade home shopping parties, and I think they’re a great alternative to craft fairs, especially if you’re just starting out and you can’t afford the booth fees of big events.
If you found these tips useful and if you’re just getting started selling your handmade goods at craft fairs, you’ll love my book, How to Make Money at Craft Shows:

Want more handmade business tips?
Check out the Badass Creatives YouTube channel!
How To Make Your Craft Show Display Look Great! Visual Merchandising Tips & Tricks
Getting started at craft shows? Here are a few visual merchandising tips & tricks to make your craft fair booth look great.
Want to learn how to make your craft fair booth look great so you can sell more art? You're in the right place!
In this video, I'm chatting with my friend & craft show organizer Nicole Stevenson all about craft show display ideas.
Nicole is the founder of Dear Handmade Life’s Patchwork Show - a series of craft shows throughout California, showcasing local handmade and independent businesses alongside food, crafting, activities and more.
Plus, for a preview adapted from my book, How to Make Money at Craft Shows, read on!
I’ve decided to share a few visual merchandising tips & tricks for making your craft show booth look awesome. Here are some things you can do to make your booth look killer.
How you set up your display will depend on the type of art you make of course, but use these ideas as a jumping off point. Be creative with your displays – you’re an artist after all!
Disclosure: This post features Amazon Associate affiliate links, which means if you purchase a product via one of these links, I earn a small commission from qualifying purchases. This helps to support this site and does not affect the price you pay.
What is visual merchandising?
If you work in, manage or own a retail store of any type, visual merchandising is something you should be familiar with.
Visual merchandising includes all the things about how you can make your store (or art or craft booth!) look great. That includes how you present your products for display and perusal to help you sell more of them!
Knowing the basics of visual merchandising is useful for more than just retail boutiques. Do you sell handmade art at local craft fairs? Knowing visual merchandising basics can make your booth look great and help you make more money! Hair salons often offer related hair care products to sell – learning how to merchandise them in an eye-catching way can help grow your business!
Visual merchandising isn’t just a realm for only the artistically inclined. In fact, visual merchandising has less to do with artistic talent than one might think – its primary function is to market your business, and to make your store or booth design and layout help your customers find what they need.
Visual merchandising should serve to fulfill your customer’s needs as they shop with you. A good store design and layout will ensure that shoppers can move comfortably and easily throughout the space, and it will allow them to find what they’re looking for. If you run a small, specialty gift store which aims to delight tourists with unique & locally made items, the way you set up and arrange your store should reflect your vibe.
5 Visual Merchandising Basics:
store design & brand image
layout
fixtures
signs
how you display individual products
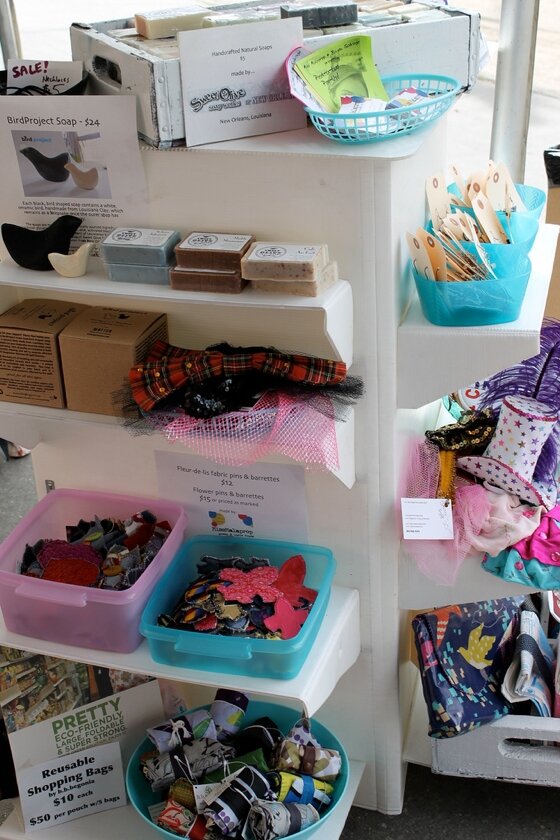
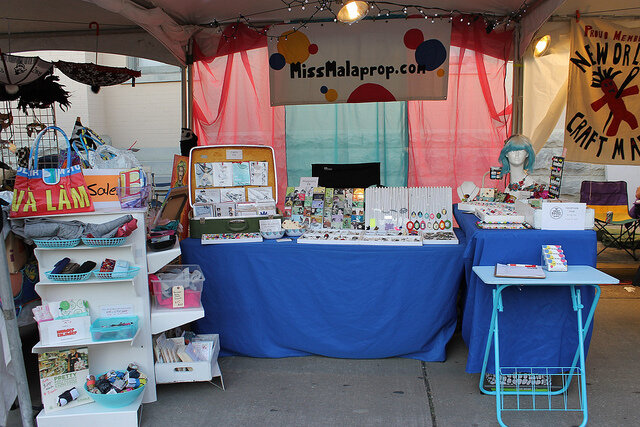
A craft show display featuring a tiered shelving unit made of lightweight plastic.
Store design & brand image
Branding is a key part of marketing any business, and a retail store is no different. Your store (or craft show booth) design & layout should take all of its cues from your brand image.
Some people think that branding means having a good logo. A logo is certainly part of branding, but not all of it.
Think about major chain stores and how their logo, brand image, and store designs are all inter-connected. Victoria’s Secret feels pink and girly, since they sell women’s lingerie. GAP feels simple, fresh, and modern, as they specialize in classic, basic apparel. Hot Topic tries to sell to edgy teens, so their stores feature lots of darkly colored design elements and the music they play in their stores is the kind of alternative rock, punk or metal that their target customer listens to.
Layout of your store or booth
You’ll want to create a great flow to your store space, so that customers can move around easily and shop with comfort. Think about those little things that make you comfortable when you’re out shopping – enough mirrors and proper lighting near a dressing room, a chair to sit down (or for your friend to sit down in while you’re trying stuff on!).
Try to arrange your space so that shoppers can comfortably explore all of your products without feeling crowded or rushed.
Fixtures
Fixtures are what you hang and display your products on. There are tons of ways to do it! You can create all sorts of wall displays with gridwall or slatwall fixtures, which are readily available from various supply companies who cater to retail stores. You can also go DIY and build your own.
If you sell clothing, you’ll probably need some garment racks. I’ve also seen some really cool DIY versions of these for store merchandising, built from various piping materials found at a hardware store!
You’ll want to draw the eye of your shoppers up and around your booth display. You can do this by using different levels and heights in your booth. A table where everything is laid out flat isn’t nearly as interesting as one that has some things displayed at different heights. There are all sorts of great retail displays you can use to create different levels in your booth.
You can use clear plexiglass risers to prop up your products at different heights.
You might want to get adjustable height tables, or I know some crafters who use risers made for beds to create different heights for their tables.

My friend made me this tiered shelf using PVC pipe & plywood, materials readily available at any hardware store. I used it to display bags made from vintage bedsheets, made by my friend Kendra of Bonga Chop.
Many artists I know use wooden crates as display props and to add height. You can lay them on their side and display things inside, or hang things from the slats. You can also stack more displays on top.
I’m also a big fan of vintage suitcases as display props:

Craft show display featuring a vintage suitcase to display greeting cards.
I use mine not only to haul stuff to and from the event, but also to create some height and to display greeting cards or other merchandise. I sewed some ribbon into the fabric lining of mine so that I could easily hang stuff from it.
I’ve also used an old shutter to display hanging earrings (most of those pictured are by abiqutie), which I attached two metal shelf brackets to on either side, and then I clamp it to my table from behind.
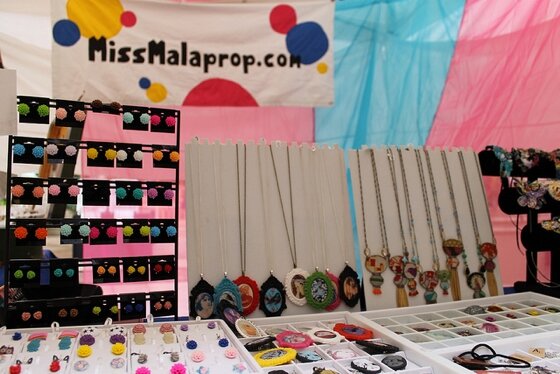
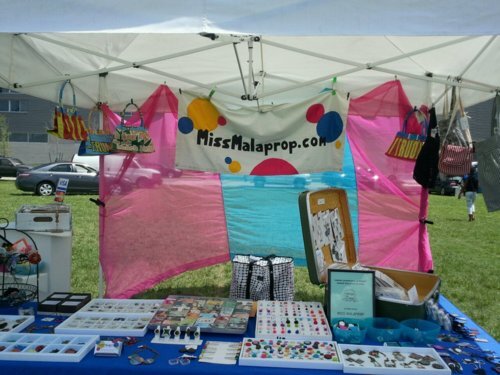
My craft show booth featured jewelry displays including freestanding displays for necklaces and earrings as well as flat, stacking trays to accomodate more products. At the back of the booth hung colorful pink & blue sheer curtains and a handmade banner.
If you make jewelry, you might lay out some things flat on your table or in stackable jewelry trays (which I use to make my setup and breakdown quick and painless), but you should also use some necklace display stands or bust style jewelry displays to add some visual interest.
Signs
Signs, as well as price tags, are a key part of visual merchandising. Have you ever been in a store that was clearly lacking in signs or price tags, and felt frustrated when you couldn’t easily find out information about a product? Signs should reflect your shop’s brand image, in font, color and layout.
You can use signs to make sure people know more about your work and how much it costs. Don’t go overboard and clutter up your booth with too many signs. But do use them to inform. (And even to entertain!)
You might also want to buy or make a banner for your booth with your business name and/or website on it so that your booth is instantly recognizable. I sewed my own, but you can also order custom printed banners.

My friend Kerry has a more rustic vibe for her business. She used these vintage wooden soda crates to display her leather & lace cuff bracelets, and a vintage wire bin to display handbags.
How you display individual products
How you display items will depend on what you sell and the type of store you are of course.
Sometimes, big, unique or high cost items look great displayed alone, to make them seem more special.
More often than not, store displays look great when similar objects are grouped together. This rule especially applies to smaller objects.
For example, if you sell jewelry, and have a few different cases to display in and you carry a few different jewelry brands or designers, group your displays by designer or by general style. It will look much more put-together and eye-catching than if you just jumble all of the necklaces together.
Always on the lookout
I’m always on the lookout for new inspiration on how to make my display look better. I love checking out other people’s booths (but of course never copying directly!), as well as checking out retail stores with great visual merchandising. Anthropologie in particular always does a fabulous job with their retail displays!
Over at Pinterest, I collect some of my favorite retail ideas as well as visual merchandising displays I like as inspiration.
Here are a few great books about running a retail store that I learned a lot from!
The Profitable Retailer: 56 surprisingly simple and effective lessons to boost your sales and profit
Cute Little Store: Between the entrepreneurial dream and business reality
Winning At Retail: Developing a Sustained Model for Retail Success
Like these Craft Fair tips and want more?
Be sure to check out my book, How to Make Money at Craft Shows.
This post was originally published at MissMalaprop.com on May 23, 2013.