
How To Make Your Craft Show Display Look Great! Visual Merchandising Tips & Tricks
Want to learn how to make your craft fair booth look great so you can sell more art? You're in the right place!
In this video, I'm chatting with my friend & craft show organizer Nicole Stevenson all about craft show display ideas.
Nicole is the founder of Dear Handmade Life’s Patchwork Show - a series of craft shows throughout California, showcasing local handmade and independent businesses alongside food, crafting, activities and more.
Plus, for a preview adapted from my book, How to Make Money at Craft Shows, read on!
I’ve decided to share a few visual merchandising tips & tricks for making your craft show booth look awesome. Here are some things you can do to make your booth look killer.
How you set up your display will depend on the type of art you make of course, but use these ideas as a jumping off point. Be creative with your displays – you’re an artist after all!
Disclosure: This post features Amazon Associate affiliate links, which means if you purchase a product via one of these links, I earn a small commission from qualifying purchases. This helps to support this site and does not affect the price you pay.
What is visual merchandising?
If you work in, manage or own a retail store of any type, visual merchandising is something you should be familiar with.
Visual merchandising includes all the things about how you can make your store (or art or craft booth!) look great. That includes how you present your products for display and perusal to help you sell more of them!
Knowing the basics of visual merchandising is useful for more than just retail boutiques. Do you sell handmade art at local craft fairs? Knowing visual merchandising basics can make your booth look great and help you make more money! Hair salons often offer related hair care products to sell – learning how to merchandise them in an eye-catching way can help grow your business!
Visual merchandising isn’t just a realm for only the artistically inclined. In fact, visual merchandising has less to do with artistic talent than one might think – its primary function is to market your business, and to make your store or booth design and layout help your customers find what they need.
Visual merchandising should serve to fulfill your customer’s needs as they shop with you. A good store design and layout will ensure that shoppers can move comfortably and easily throughout the space, and it will allow them to find what they’re looking for. If you run a small, specialty gift store which aims to delight tourists with unique & locally made items, the way you set up and arrange your store should reflect your vibe.
5 Visual Merchandising Basics:
store design & brand image
layout
fixtures
signs
how you display individual products
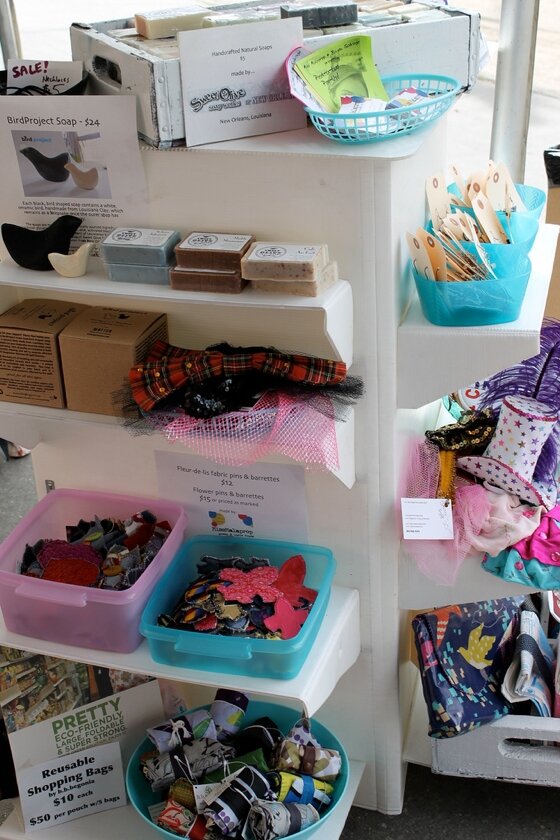
A craft show display featuring a tiered shelving unit made of lightweight plastic.
Store design & brand image
Branding is a key part of marketing any business, and a retail store is no different. Your store (or craft show booth) design & layout should take all of its cues from your brand image.
Some people think that branding means having a good logo. A logo is certainly part of branding, but not all of it.
Think about major chain stores and how their logo, brand image, and store designs are all inter-connected. Victoria’s Secret feels pink and girly, since they sell women’s lingerie. GAP feels simple, fresh, and modern, as they specialize in classic, basic apparel. Hot Topic tries to sell to edgy teens, so their stores feature lots of darkly colored design elements and the music they play in their stores is the kind of alternative rock, punk or metal that their target customer listens to.
Layout of your store or booth
You’ll want to create a great flow to your store space, so that customers can move around easily and shop with comfort. Think about those little things that make you comfortable when you’re out shopping – enough mirrors and proper lighting near a dressing room, a chair to sit down (or for your friend to sit down in while you’re trying stuff on!).
Try to arrange your space so that shoppers can comfortably explore all of your products without feeling crowded or rushed.
Fixtures
Fixtures are what you hang and display your products on. There are tons of ways to do it! You can create all sorts of wall displays with gridwall or slatwall fixtures, which are readily available from various supply companies who cater to retail stores. You can also go DIY and build your own.
If you sell clothing, you’ll probably need some garment racks. I’ve also seen some really cool DIY versions of these for store merchandising, built from various piping materials found at a hardware store!
You’ll want to draw the eye of your shoppers up and around your booth display. You can do this by using different levels and heights in your booth. A table where everything is laid out flat isn’t nearly as interesting as one that has some things displayed at different heights. There are all sorts of great retail displays you can use to create different levels in your booth.
You can use clear plexiglass risers to prop up your products at different heights.
You might want to get adjustable height tables, or I know some crafters who use risers made for beds to create different heights for their tables.

My friend made me this tiered shelf using PVC pipe & plywood, materials readily available at any hardware store. I used it to display bags made from vintage bedsheets, made by my friend Kendra of Bonga Chop.
Many artists I know use wooden crates as display props and to add height. You can lay them on their side and display things inside, or hang things from the slats. You can also stack more displays on top.
I’m also a big fan of vintage suitcases as display props:

Craft show display featuring a vintage suitcase to display greeting cards.
I use mine not only to haul stuff to and from the event, but also to create some height and to display greeting cards or other merchandise. I sewed some ribbon into the fabric lining of mine so that I could easily hang stuff from it.
I’ve also used an old shutter to display hanging earrings (most of those pictured are by abiqutie), which I attached two metal shelf brackets to on either side, and then I clamp it to my table from behind.
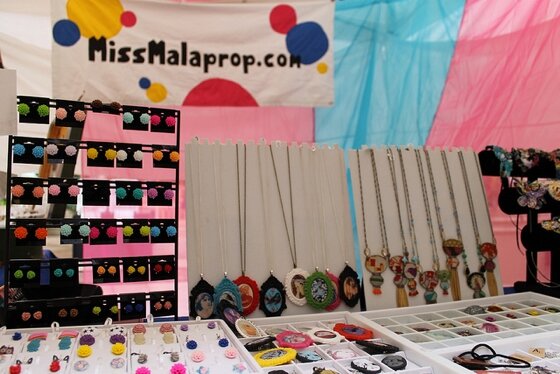
My craft show booth featured jewelry displays including freestanding displays for necklaces and earrings as well as flat, stacking trays to accomodate more products. At the back of the booth hung colorful pink & blue sheer curtains and a handmade banner.
If you make jewelry, you might lay out some things flat on your table or in stackable jewelry trays (which I use to make my setup and breakdown quick and painless), but you should also use some necklace display stands or bust style jewelry displays to add some visual interest.
Signs
Signs, as well as price tags, are a key part of visual merchandising. Have you ever been in a store that was clearly lacking in signs or price tags, and felt frustrated when you couldn’t easily find out information about a product? Signs should reflect your shop’s brand image, in font, color and layout.
You can use signs to make sure people know more about your work and how much it costs. Don’t go overboard and clutter up your booth with too many signs. But do use them to inform. (And even to entertain!)
You might also want to buy or make a banner for your booth with your business name and/or website on it so that your booth is instantly recognizable. I sewed my own, but you can also order custom printed banners.

My friend Kerry has a more rustic vibe for her business. She used these vintage wooden soda crates to display her leather & lace cuff bracelets, and a vintage wire bin to display handbags.
How you display individual products
How you display items will depend on what you sell and the type of store you are of course.
Sometimes, big, unique or high cost items look great displayed alone, to make them seem more special.
More often than not, store displays look great when similar objects are grouped together. This rule especially applies to smaller objects.
For example, if you sell jewelry, and have a few different cases to display in and you carry a few different jewelry brands or designers, group your displays by designer or by general style. It will look much more put-together and eye-catching than if you just jumble all of the necklaces together.
Always on the lookout
I’m always on the lookout for new inspiration on how to make my display look better. I love checking out other people’s booths (but of course never copying directly!), as well as checking out retail stores with great visual merchandising. Anthropologie in particular always does a fabulous job with their retail displays!
Over at Pinterest, I collect some of my favorite retail ideas as well as visual merchandising displays I like as inspiration.
Here are a few great books about running a retail store that I learned a lot from!
The Profitable Retailer: 56 surprisingly simple and effective lessons to boost your sales and profit
Cute Little Store: Between the entrepreneurial dream and business reality
Winning At Retail: Developing a Sustained Model for Retail Success
Like these Craft Fair tips and want more?
Be sure to check out my book, How to Make Money at Craft Shows.
This post was originally published at MissMalaprop.com on May 23, 2013.